Connecting to a ReadyNAS Pro from Windows 10
Date: January 10, 2025
Last Updated: January 11, 2025
When you try to connect a Windows 10 machine to a ReadyNAS Pro share you will get an error because the SMB version 1 protocol is no longer secure. I tried to enable NFS sharing in the admin page and then mount them via NFS which sort of worked, but I had to mount the shares via the command line and Windows was creating weird Zone identifier files in the folder, so I decided to try and enable the newer SMB protocol since I found a forum post talking about it. Since it turned out to be much trickier than suggested in the forums, I wanted to document it here.
Enabling SSH Access
First, we need to enable SSH access on the ReadyNAS Pro. To do this, I downloaded the "Enable Root SSH Access" add-on from https://kb.netgear.com/24551/ReadyNAS-Add-ons-for-RAIDiator-4-2-x86. Then, I installed the add-on by visiting the ReadyNAS admin page and going to Add-ons "Add New". After a reboot the add on was sucessfully installed. When trying to ssh to the netgear box from a powershell however, I was getting the following error:
Unable to negotiate with 10.0.0.12 port 22: no matching key exchange method
found. Their offer:
diffie-hellman-group-exchange-sha1,diffie-hellman-group14-sha1,diffie-hellman-group1-sha1
I was able to do something similar to these instructions to fix this issue. In a new Powershell run as Administrator I ran the two commands:
> copy nul > C:\ProgramData\ssh\ssh_config
> notepad C:\ProgramData\ssh\ssh_config
and then added the following to the newly created ssh_config file:
Host readynas.internal
  MACs hmac-sha1
  KexAlgorithms diffie-hellman-group1-sha1
  PubkeyAcceptedAlgorithms +ssh-rsa
  HostKeyAlgorithms +ssh-rsa
With this done I was able to ssh in as root from Powershell
$ ssh root@readynas.internal
Editing the SAMBA Configuration File
Once in, I edited the smb.conf file by running:
$ vi /etc/samba/smb.conf
and added the two following lines to the [global] section:
[global]
max protocol = SMB2
min protocol = SMB2
You can check to see if you made any mistake by running:
$ smbstatus
If you see a warning about the protocol you added, then you probably screwed up.
Mapping the Drive

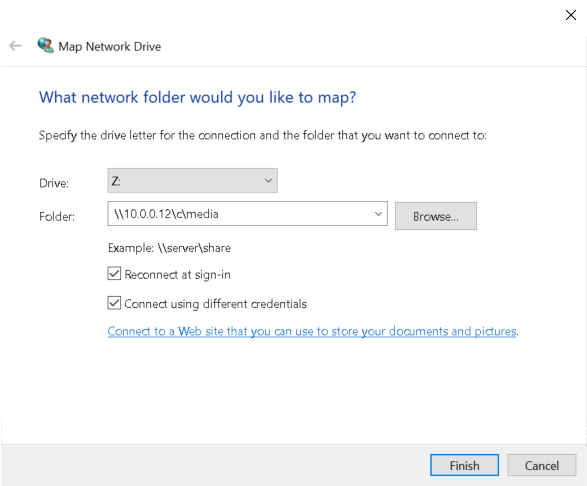
Finally, I was able to access the shares from a Windows machine by opening File Explorer, right clicking Network and going to "Map Network Drive". For the "Folder":
\\readynas.internal\c\media
where you should replace readynas.internal with your ReadyNAS IP address and media with whatever your share is called. Then you need to check "Connect using different credentials" to allow you to connect using a username and password.
Then, when prompted I put in the user name admin and the administrator password and I was able to successfully mount the drives.
Further Notes
After trying to back up some files I noticed an issue when I tried to back up a huge folder using the File Explorer. Windows would start calculating the disk space required and then say the drive was unavailable. After some searching online, I determined that backing up that many files using the File Explorer probably wasn't a good idea, so in the end I had to use the command line anyway.
Copying Many Files from the Command Line
If you are planning to back up a folder for which you need administrative rights you should first launch powershell as an administrator. Then, to mount the drive and backup the Users folder:
$ net use Z: \\readynas.internal\c\media /user:admin
$ Robocopy.exe 'C:\Users' 'Z:\path\to\backup'
Backing up using rsync from a Linux Machine
I also wanted to test out backing up files using rsync from a Linux machine and finally got a script that works pretty well. You also need to create a ssh_config file like on the Windows machine to allow it to connect with the outdated key exchange algorithms.
I updated the ~/.ssh/config file to look like:
Host readynas.internal
  KexAlgorithms=+diffie-hellman-group-exchange-sha1
  HostKeyAlgorithms=+ssh-rsa
  PubKeyAcceptedAlgorithms=+ssh-rsa
To run this script, it's also probably a good idea to create an ssh key on the ReadyNAS so you don't have to continuously type your password. You can do that on the Linux client machine like so:
$ ssh-keygen -t rsa -b 4096
Generating public/private rsa key pair.
Enter file in which to save the key (/home/user/.ssh/id_rsa): /home/user/.ssh/id_rsa_readynas
Then, we can copy the file over by running:
$ ssh-copy-id -i ~/.ssh/id_rsa_readynas.pub root@readynas.internal
Then, you need to update your ~/.ssh/config file:
Host readynas.internal
  IdentityFile ~/.ssh/id_rsa_readynas
  KexAlgorithms=+diffie-hellman-group-exchange-sha1
  HostKeyAlgorithms=+ssh-rsa
  PubKeyAcceptedAlgorithms=+ssh-rsa
Finally, the backup script I am using is:
#!/bin/bash
set -x

# Basic snapshot-style rsync backup script

# Config
OPT="-aPh"
LINK="/snapshots/user/last"
SRC="/home/user/"
SNAP="/snapshots/user/"
SSH="root@readynas.internal"
date=`date "+%Y_%b_%d_%H_%M_%S"`

ssh $SSH "mkdir -p $SNAP"

# Run rsync to create snapshot
rsync $OPT --link-dest=$LINK $SRC ${SSH}:${SNAP}$date

# Remove symlink to previous snapshot
ssh $SSH "rm -f $LINK"

# Create new symlink to latest snapshot for the next backup to hardlink
ssh $SSH "ln -s ${SNAP}$date $LINK"
I modified this script from an excellent wiki page on the Arch Wiki. It is really nice because it gives you a full snapshot in time of your files and it doesn't duplicate files which haven't changed since the last time you backed up, instead creating a hard link to the same inode.